A step-by-step guide to install Apache Cassandra and DataStax OpsCenter on Ubuntu 12.04 LTS machines in the Windows Azure cloud environment.
Windows Azure, the cloud-computing platform by Microsoft, is one of the cloud computing platforms (as for example Amazon EC2) that came out in the last couple of years. Allowing the creation of virtual cloud machines on demand, the service supports applications that want to be dynamically scalable, making the platform well-suited for testing Cassandra clusters in the cloud without the need to provide hardware in a custom data center.
This guide will show:
- How to create Ubuntu 12.04 LTS machines for a Cassandra Cluster
- How to install Cassandra
- How to install DataStax OpsCenter
You do not need to use Azure, actually. The Ubuntu installation guide is the same for every environment. So if you want to install Cassandra on your custom hardware, just skip the Azure part.
Create the first virtual machine
First, log into the Windows Azure Management Portal. That’s the place where you can create your virtual machines. At the bottom left, you will find a big button labelled “new”. Click it and create a virtual machine from gallery:
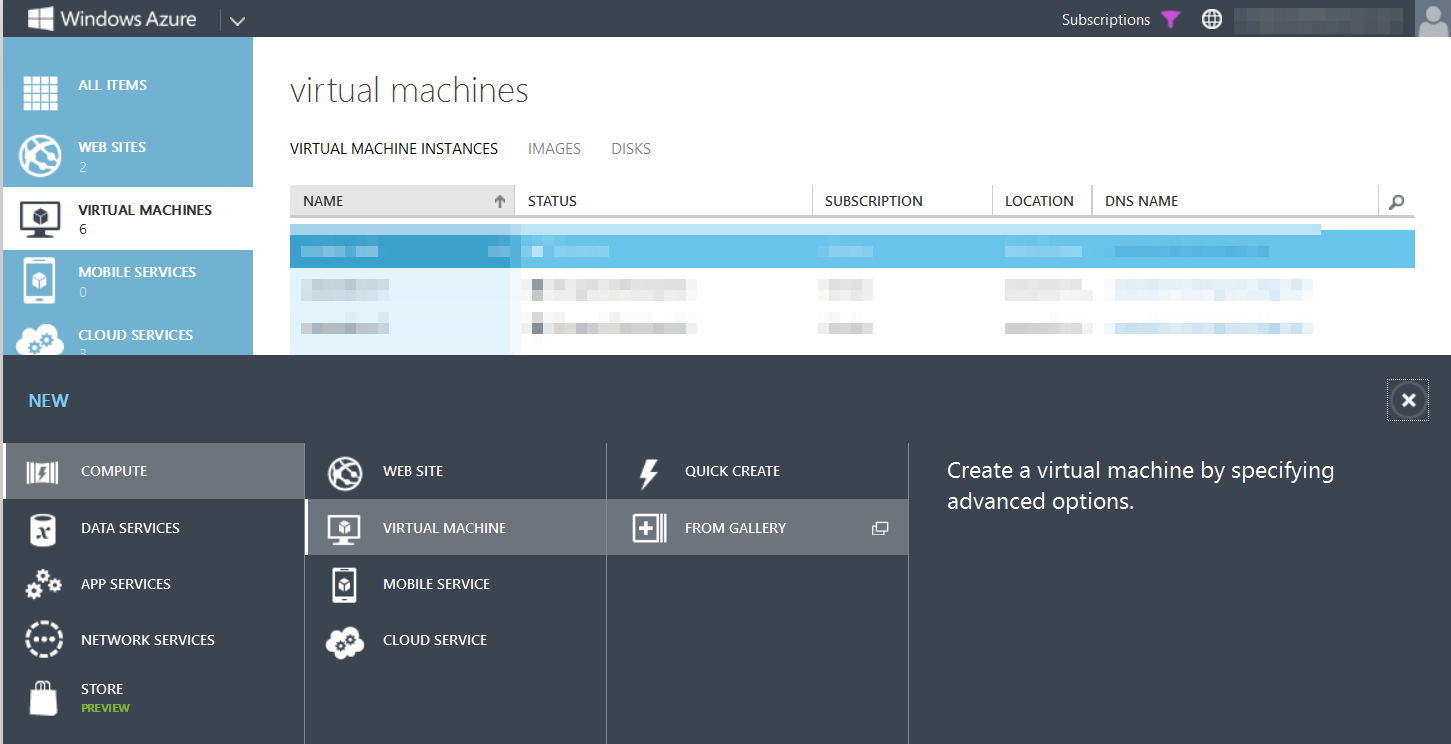
Create new virtual machine
Use Ubuntu Server 12.04 LTS from the list of available images and click next. Afterwards, perform the initial virtual machine configuration:
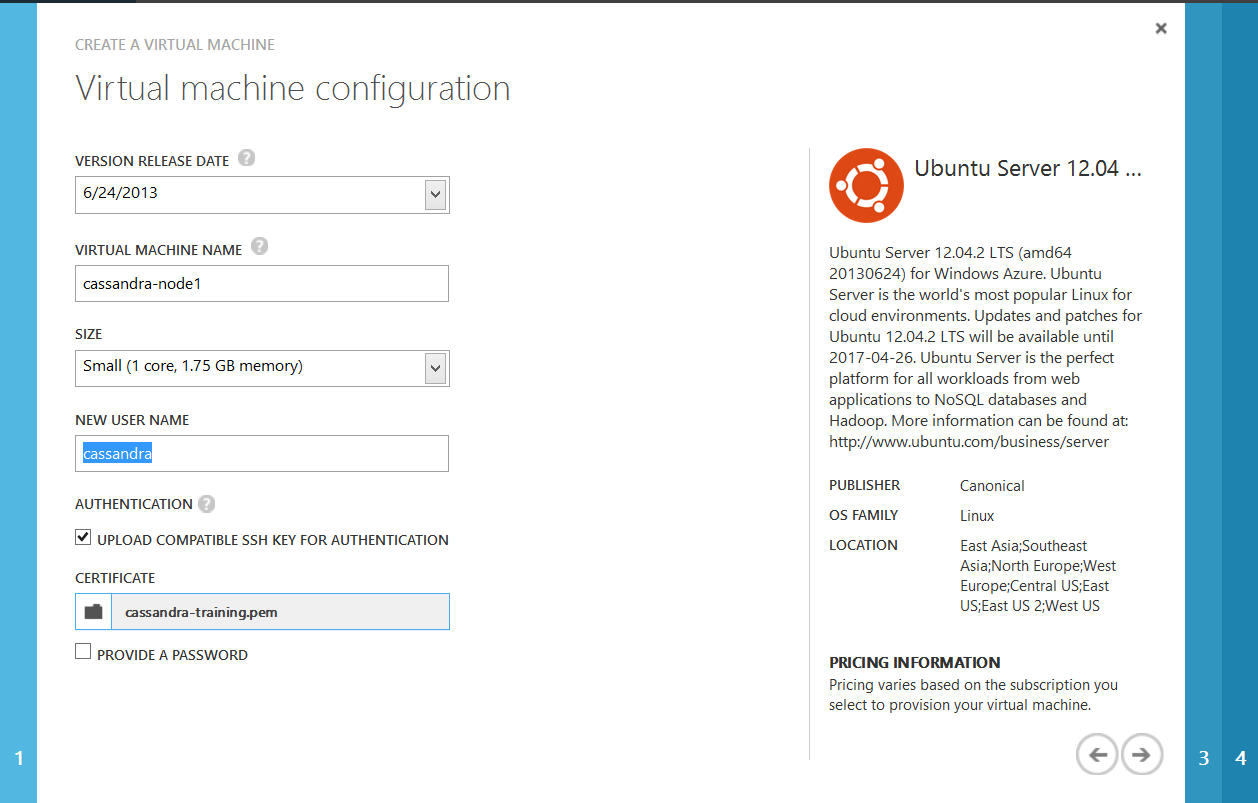
Initial Virtual Machine Configuration
On this screen, you should give the virtual machine an expressive name. Since Cassandra does not employ a master/slave concept, a simple numbering scheme for the individual Cassandra nodes should be sufficient. You can change the user name to anything that seems sensible to you. You should however upload a certificate, as this makes the setup of OpsCenter easier.
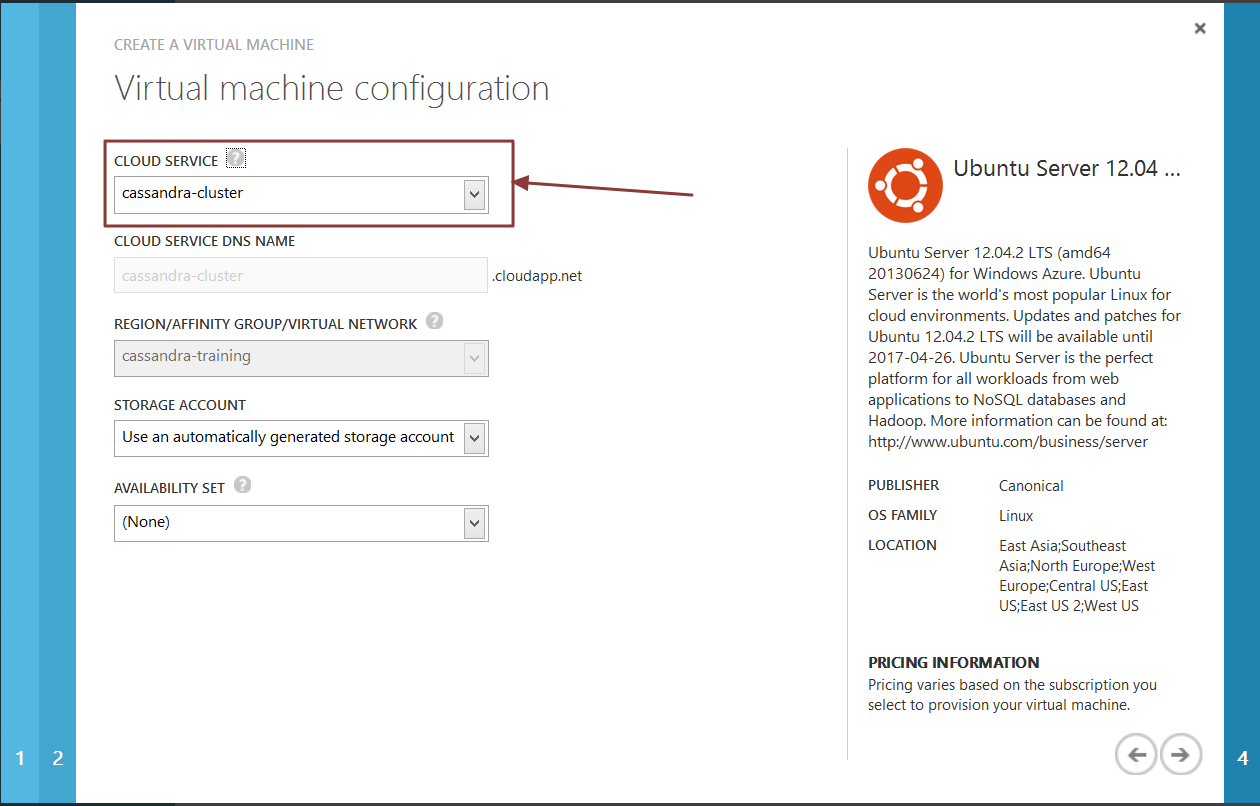
On the next screen, you will configure the cloud service:
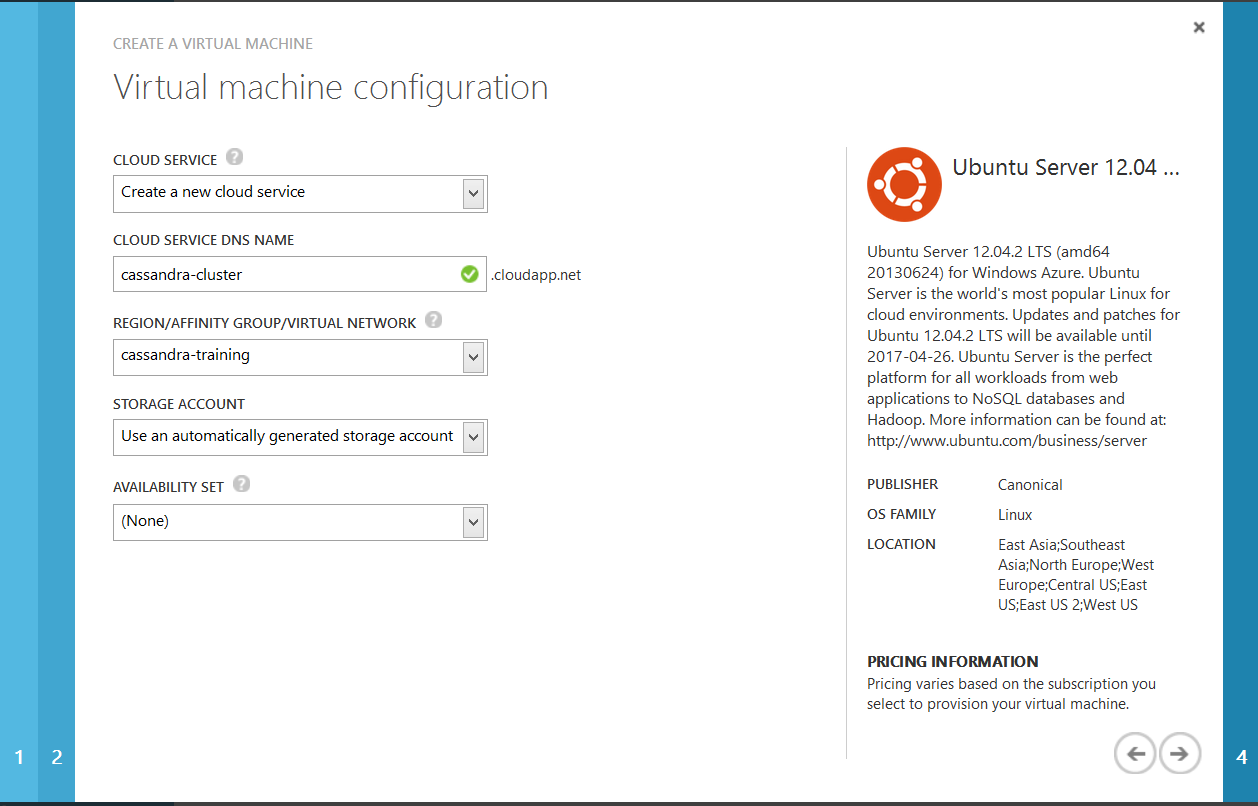
Configure Cloud Service
The cloud service name used here will be used as DNS name for your whole Cassandra cluster.
Finish the installation, and after a couple of minutes, your first virtual machine should be up and running.
Create subsequent machines
Now you can create subsequent machines, as much as you would like to take part in your cluster. You should also decide whether or not you want OpsCenter running on one of the Cassandra Nodes or on an individual machine. For the sake of simplicity, I chose the former.
The process is similar, except the last step where you configure the cloud service. You should use the same cloud service as in the previous example instead of creating a new cloud service:
Connect VM to existing cloud service
That’s actually a vital part: This allows your virtual machines to behave as if they were in the same subnet. Otherwise you would have to manage the ports used by Cassandra manually – and as OpsCenter and nodetool uses JMX and JMX communicates over dynamic ports, this can be a pain.
You should also setup your SSH endpoints right away:
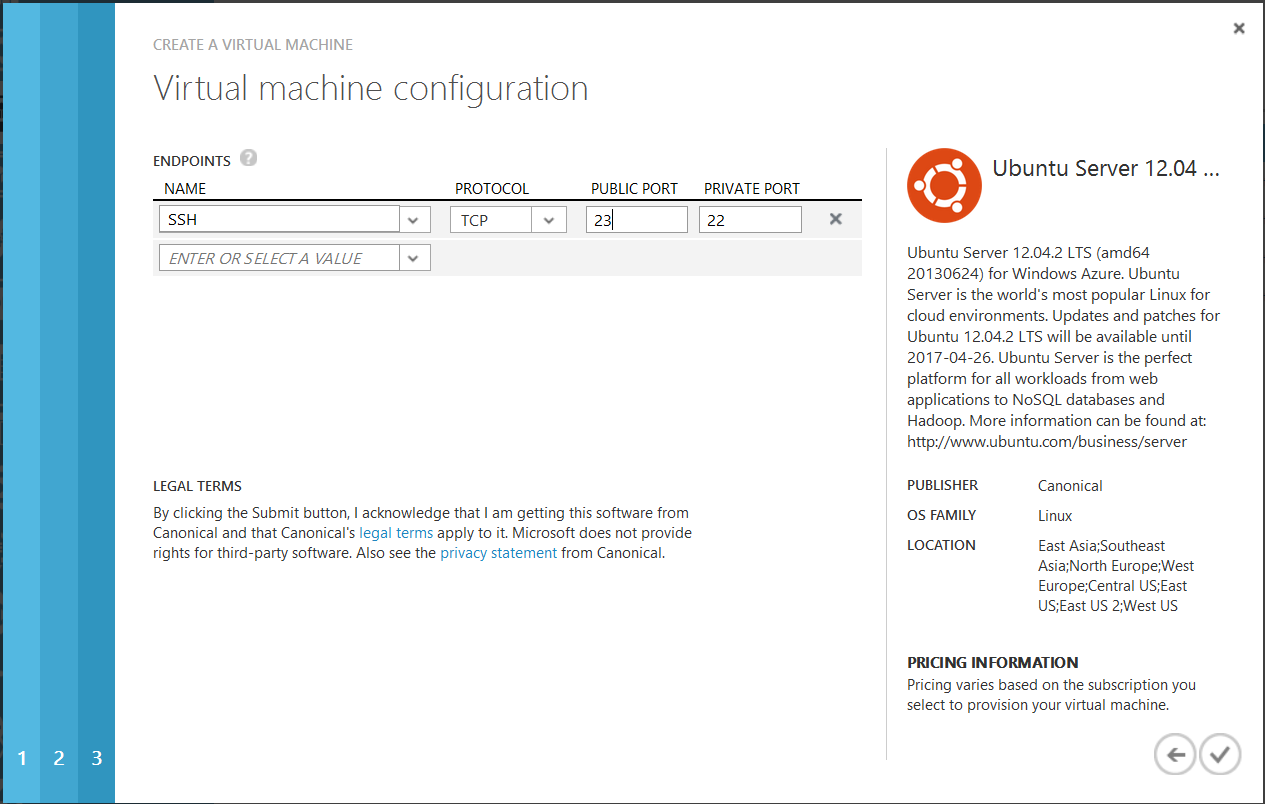
Virtual Machine Setup Endpoints
You have to choose different ports for SSH, as all the machines share on public DNS name and IP address. For the machine running that will run OpsCenter, you can bind the internal port “8888” to a public port of your liking (I used 8888 as well).
Install Cassandra
After creating up all the nodes needed, you can continue to perform the initial setup. Note that you have to repeat this part for every machine in the cluster.
Prerequisite: Install Java
Now you can install the necessary packages. Use the private key belonging to the certificate you configured in order to connect to the virtual machines. First, you need to install the prerequisites, namely Java. DataStax suggests to use Oracle Java 6, so we’ll take this route here:
sudo add-apt-repository -y ppa:webupd8team/java
sudo apt-get update
sudo apt-get install -y oracle-java6-installer oracle-java6-set-default libjna-java
This will install Oracle 6 and set it as default Java distribution. You will also need to accept the Oracle license agreement. libjna allows Cassandra to use native system functionality, which avoids the Cassandra heap from being swapped out and also allows to store caches off-heap.
If you execute java -version, you should now see an output similar to this one:
cassandra@cassandra-node1:~$ java -version
java version "1.6.0_45"
Java(TM) SE Runtime Environment (build 1.6.0_45-b06)
Java HotSpot(TM) 64-Bit Server VM (build 20.45-b01, mixed mode)
Cassandra Configuration
With Java installed, you can continue with the Cassandra installation. In this example, you will use the datastax installation package for Cassandra. To install Cassandra, execute the following lines:
curl -L http://debian.datastax.com/debian/repo_key | sudo apt-key add -
sudo sh -c 'echo "deb http://debian.datastax.com/community/ stable main" >> /etc/apt/sources.list.d/datastax.list'
sudo apt-get update
sudo apt-get install -y dsc12
Now Cassandra is installed, but it needs to be stopped in order for the configuration to be updated. So stop cassandra, remove any data that is stored from the data directory and then edit the configuration:
sudo service cassandra stop
sudo rm -rf /var/lib/cassandra/data/system/*
sudo nano /etc/cassandra/cassandra.yaml
The important entries are:
- The cluster name right at the top. Use the same name on every node. You can leave the “Test cluster” entry if you want to.
- The virtual nodes and token range settings. At the time of writing, the virtual nodes feature is not fully supported by OpsCenter, so we will leave it out. Instead, you have to calculate and define token ranges manually. The necessary setting is called “initial_token”. You have to calculate these tokens for yourself. Fortunately, you can use our online Cassanda initial token calculator. The result for four nodes would be:
['-9223372036854775808', '-4611686018427387904', '0', '4611686018427387904']
respectively. Choose one of those tokens for each node.
- The seeds. These are the hosts a Cassandra node will connect to initially. You can use the hostnames here and should define more than one (in case this node is down).
- Listen address. Set it to the hostname (example: “cassandra-node1”)
- RPC address: You can set this to 0.0.0.0
You need to repeat these installation and configuration steps on all the machines of your cluster, which can be a little cumbersome. Automation of these tasks will be part of a separate tutorial.
Smoke Test
After you have performed the configuration for each of your nodes, try to bring up the first node. Execute the following line on one of your machines (it should be a node mentioned in the seeds list) to start cassandra as a background service:
sudo service cassandra start
Wait one or two minutes to allow cassandra to finish startup, then check if it runs ok with “nodetool ring”. The output should be something like this:
cassandra@cassandra-node1:/var/log/cassandra$ nodetool ring

Datacenter: datacenter1
==========
Replicas: 1

Address        Rack        Status State   Load            Owns                Token

10.140.104.35  rack1       Up     Normal  61.31 KB        100.00%             2506013998029815010
Congratulations, the first node is up and running!
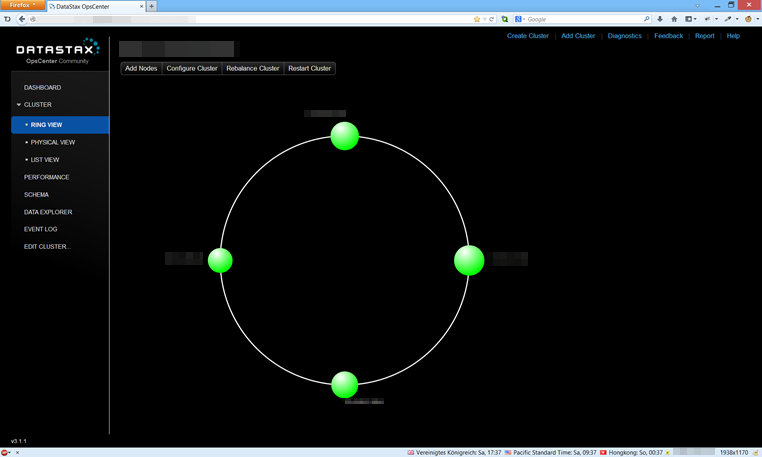
Now repeat the same process for each node at a time and leave Cassandra some time to join the cluster. You can always check the status of the cluster with nodetool ring. After starting up all the nodes, you should have a balanced cluster as in the following screenshot:
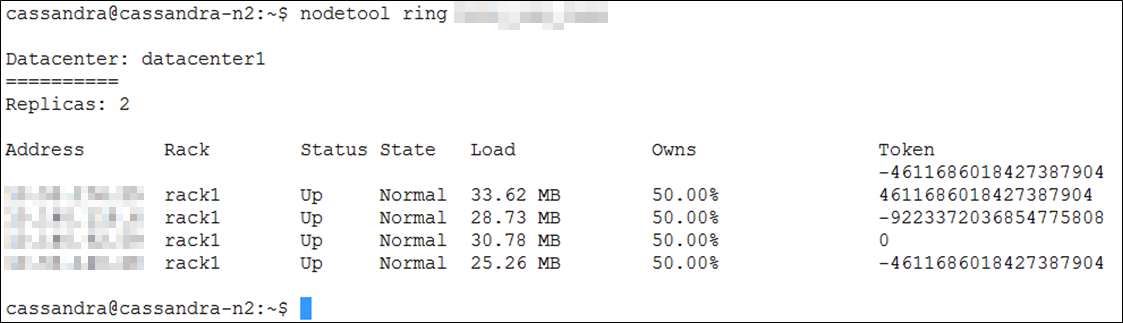
Nodetool Ring Output
That’s it, Cassandra is running. If you want to, you can now experiment with the command line interface (cassandra-cli) or the CQL shell (cqlsh).
Install OpsCenter
The final part of the installation procedure is the installation of OpsCenter. For this how-to, I assume that you will install it on one of the nodes already running Cassandra, so the initial installation of Java will not be necessary. To install OpsCenter, execute the following commands:
sudo apt-get install opscenter-free libssl0.9.8
Afterwards, configure OpsCenter with the following command and start it:
sudo nano /etc/opscenter/opscenterd.conf
Bind the interface to “0.0.0.0” so you can access it from the outside. You can also change the port if you want to. If you haven’t already done it, it is now time to add an endpoint for the OpsCenter port (8888) in the management interface.
You’re good to go now. Start OpsCenter with
sudo service opscenterd start
and then connect with your web browser to the web interface.
Configure OpsCenter
You are greeted by OpsCenter with a screen asking you whether to create a new cluster or use an existing one. The cluster is already running, so you’ll go for option 2:

Use existing cluster
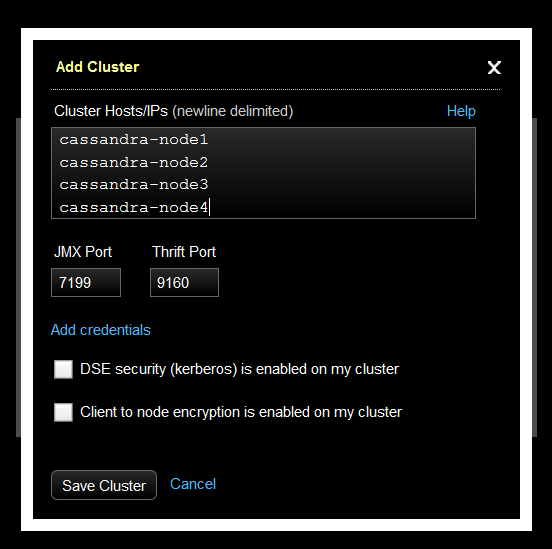
On the next screen, you will need to add the cluster nodes to the OpsCenter configuration:
Add Cluster Nodes
OpsCenter is now connected to your cluster, but I cannot do very much. Perhaps you already saw the notification at the top: Press the fix button in order to install the agents on each node:
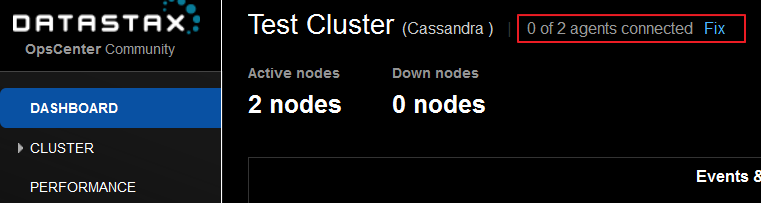
Install agents
OpsCenter will ask you for your credentials. If you used key-based authentication, just copy the private SSH key to the credentials box. Wait until the installation is finished, then go to cluster/ring view and see your Cassandra ring in action!

OpsCenter Ring View
Where to go from here?
Your cluster is running and your management interface is up. Now you can try to interface the distributed database by your applications.
The easiest way is to deploy your application into the same cloud service as well as you do not have to manage endpoints. If you want your application to be deployed from the outside, you will have to fiddle around with ports a little bit. Azure’s load-balanced endpoint feature does not work with all client frameworks. Another would be to assign individual ports to your Cassandra nodes and update the hosts file of the application servers. But these issues are beyond the scope of this how-to.
Latest posts by Gernot R. Bauer (see all)
- This was Cassandra Meetup in Vienna - 2014-01-20
- Announcement: First Cassandra Meetup Vienna on January 13, 2014 - 2014-01-09
- Cassandra Summit Europe 2013 - 2013-10-26